Zapier connects Referly to more than 8,000 other apps without anyone writing code. Once the two are linked, Referly can announce things as they happen — a new affiliate, a new referred customer, a new sale — and other apps can react. It also works the other way round: when something happens in your checkout, your form tool, or your course platform, Zapier can record it in Referly so the right affiliate gets credit. This guide walks through the whole thing end to end, including the parts that happen on Zapier’s side rather than in Referly.
Zapier is part of Referly’s API access, which is included on the Business and Agency plans and isn’t available during a free trial. On other plans the connection will be refused. See API access.

What Referly can do in Zapier

The Referly app on Zapier has three kinds of steps: triggers (Referly tells Zapier something happened), actions (Zapier changes something in Referly), and searches (Zapier looks something up in Referly).

Triggers

A trigger is the first step of a Zap. These are the nine events Referly can announce: Two things worth knowing about these: They fire no matter where the event came from. A sale recorded by your Stripe or Shopify connection, one you added by hand, and one created by another Zap all set off New Sale Created in exactly the same way. The same goes for affiliates who sign up on your portal, affiliates you add from the dashboard, and affiliates created by another tool. They are instant. Referly pushes the event to Zapier the moment it happens, rather than Zapier checking every fifteen minutes the way it does with many apps.

Actions

An action is a step that changes something in Referly:

Searches

A search finds a record and hands its details to the next step. It doesn’t change anything:

What Zapier can and can’t track

This is the part people get wrong most often, so it’s worth being blunt about it. Two more limits that matter in practice: Zapier can’t work out attribution for you. When Zapier creates a referral or a sale, you have to tell it which affiliate to credit. There’s a whole section on how to get that value below. Zapier can’t record a zero-value sale. Create Sale needs a total amount above zero. To mark a customer as referred without any money changing hands, use Create Referral instead.

Before you start

1

Check your plan

You need a Business or Agency plan. Free trials don’t include API access.
2

Have an affiliate program set up

You’ll pick which program to connect. If you haven’t created one yet, see set up your program.
3

Install the tracking script

Not needed if you only want Referly to trigger Zaps. It is needed if you want Zapier to record referrals or sales, because the script is what captures which affiliate sent the visitor. See install the snippet.

Step 1: Create a Zapier account

Skip this if you already have one.
1

Go to zapier.com

Open zapier.com in your browser and select Sign up.
2

Create the account

Follow the prompts, then confirm your email address if Zapier asks you to.
3

Choose a plan

The free plan is enough to try one Zap. It allows a limited number of tasks each month, where a task is counted every time an action step runs successfully — triggers don’t count. If your program records more than a handful of sales a day, you’ll need a paid Zapier plan. Zapier’s own plans and pricing page has the current numbers.

Step 2: Connect Referly to Zapier

The connection is made from inside Zapier, and Zapier sends you to Referly to approve it. You can start it from the Zap editor when you first pick Referly as a step, which is what most people do.
1

Add a Referly step in Zapier

In Zapier, select + Create in the left sidebar, then Zap workflows. Search for Referly in the app picker and select it.
2

Select Sign in

Under the app and event, Zapier shows an Account section. Select Sign in, or + Connect a new account if you’ve connected Referly before. A Referly window opens.
3

Log in to Referly

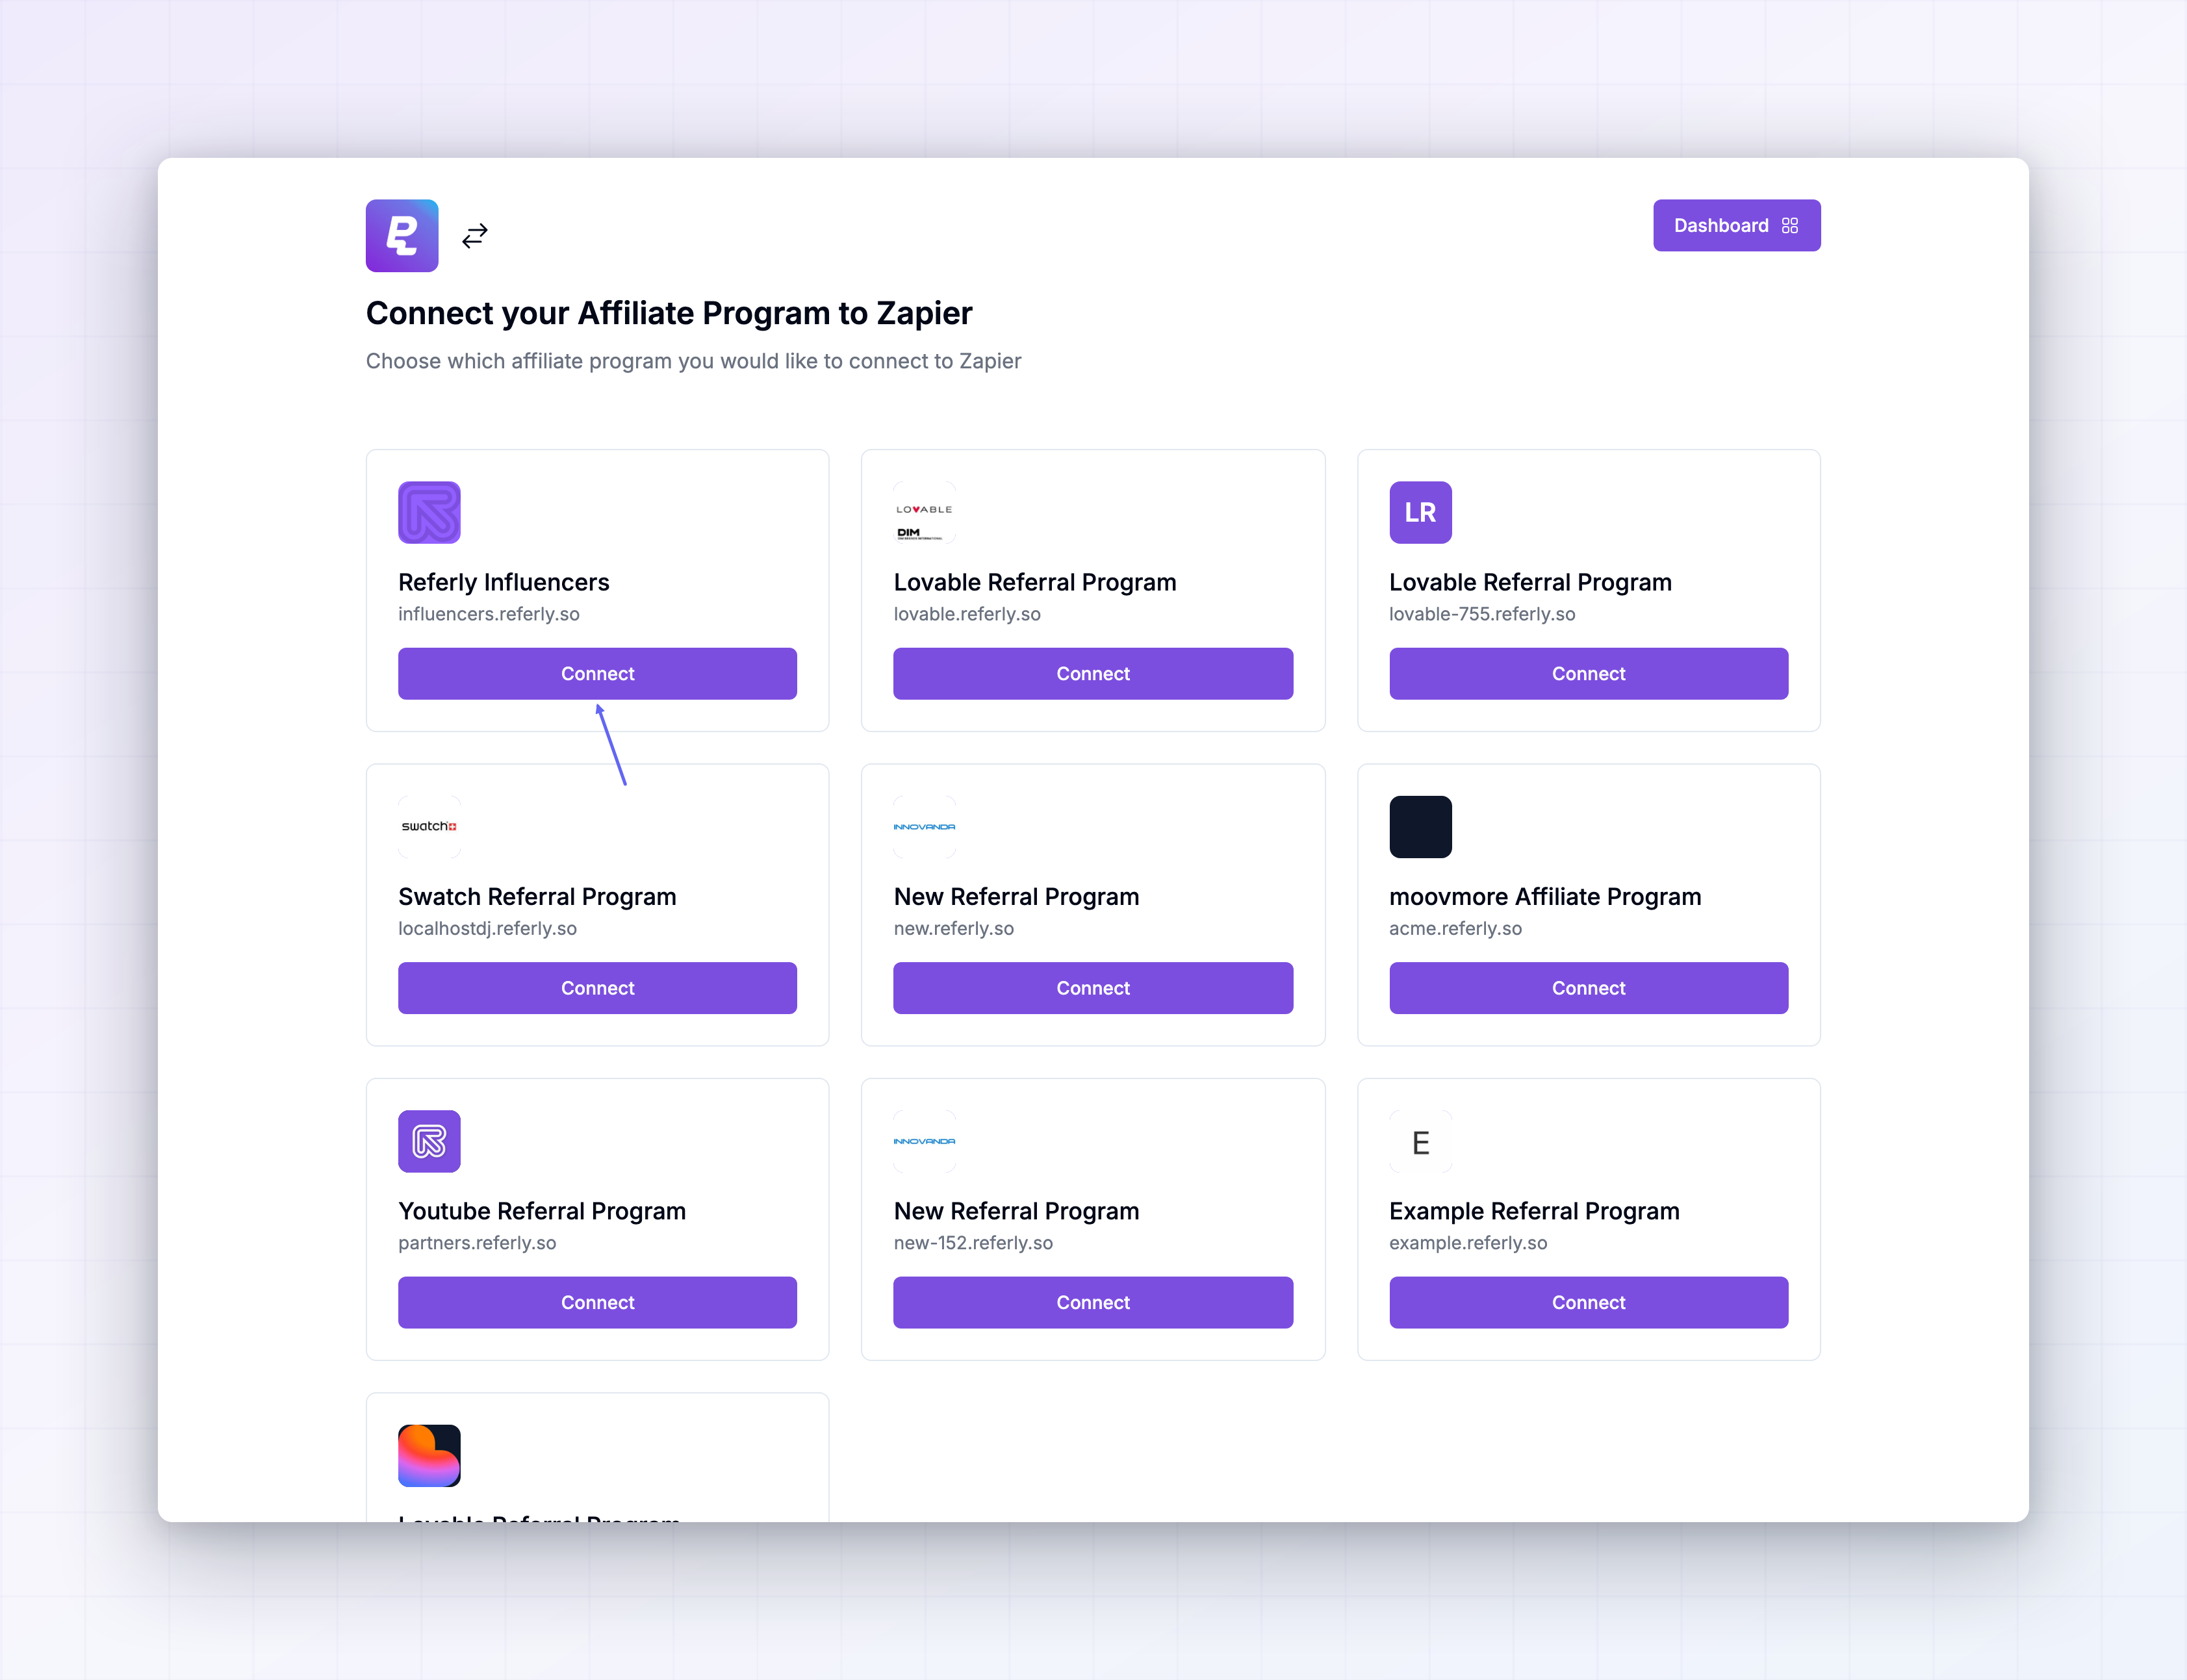
Log in with your Referly account if you aren’t already logged in. You’ll land on the “Connect your Affiliate Program to Zapier” screen.
4

Choose the program

Every program on your account appears as a card with its name and domain. Select Connect on the one you want.
5

Confirm

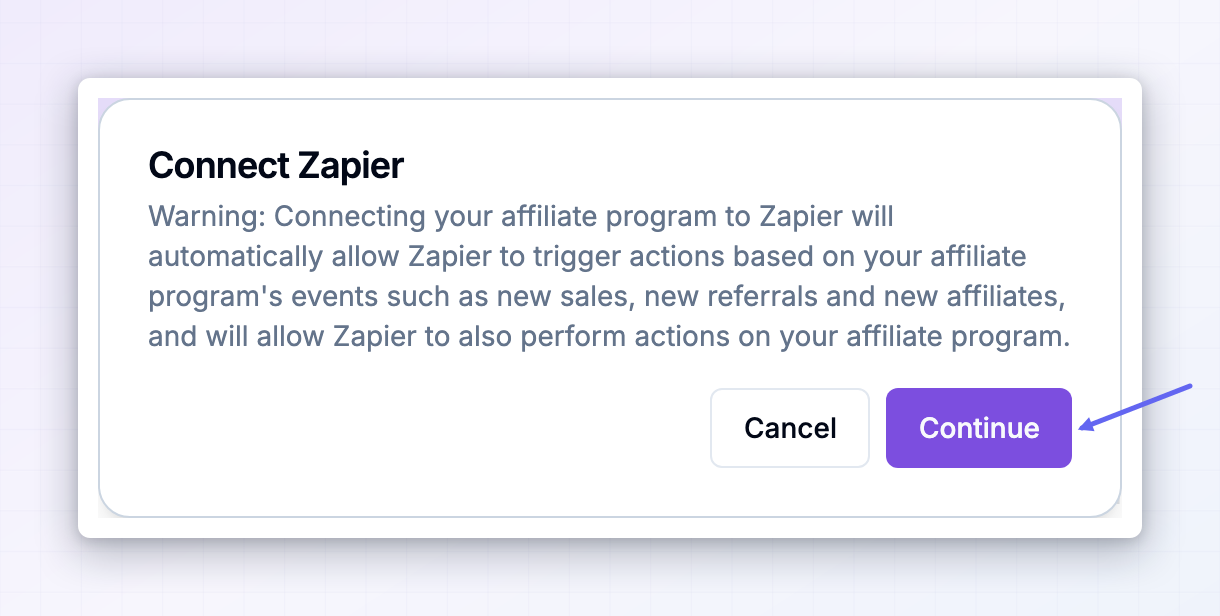
A dialog explains that Zapier will be able to react to your program’s events and make changes to your program. Select Continue.
6

Back to Zapier

The window closes and the connection appears in Zapier. Zapier shows your program’s name so you can check you picked the right one.
A connection covers exactly one affiliate program. If you run several, repeat this for each one and give each connection a name you’ll recognise in Zapier. Connections made this way don’t appear in your API keys list.
You can also start from Referly’s side to check what’s available: open Settings from the left sidebar, go to Integrations, and select the Zapier card.

Step 3: Build a Zap that starts in Referly

This is the simpler direction: something happens in Referly, another app reacts.
1

Pick the trigger app

In the Zap editor, choose Referly as the trigger app.
2

Pick the trigger event

Choose one of the nine triggers listed above — for example New Sale Created. Select Continue.
3

Choose the connection

Pick the Referly connection you made in step 2, then select Continue.
4

Test the trigger

Select Test trigger. Zapier pulls a recent record from your program, or a sample record if your program has none yet, so you can see the field names and values you’ll be working with.
If Zapier finds no records, create one in Referly — record a test sale, or add a test affiliate — and select Test trigger again.
5

Add the action

Select the + below the trigger, choose the app that should react, and pick its event.
6

Map the fields

In the action’s fields, select the field box and pick values from the Referly trigger. Zapier lists them by name, so the affiliate’s email or the sale amount is a couple of clicks away.
7

Test and publish

Select Test step to send one real record through, check it arrived, then select Publish.
A published Zap only handles data created after you publish it. Anything that happened before is ignored.

Step 4: Send data into Referly

The other direction — something happens elsewhere and Zapier records it in Referly — takes one extra piece of work: telling Referly which affiliate deserves the credit.

Get the affiliate ID out of your website

When a visitor arrives from an affiliate link like yourwebsite.com/?ref=janedoe, the tracking script stores who sent them and puts two values on the page for you to use:
  • window.affiliateId — the ID of that specific click. This is the most accurate value, because it ties the sale to one visit.
  • window.affiliateRef — the affiliate’s link name, janedoe in the example above.
Referly accepts either one in the affiliate fields described below, so use whichever your other tool can carry. Getting that value into your trigger app is the part that happens outside Referly, and how you do it depends on the tool:
  • Forms (Typeform, Jotform, Gravity Forms, HubSpot forms and similar) — add a hidden field, and set its value from window.affiliateId when the page loads. Every one of these tools documents hidden fields; search their help centre for “hidden field”.
  • Checkout and billing tools — most let you attach your own reference or metadata to a customer or an order. Put the value there.
  • Course and membership platforms — look for custom fields on the member record.
If the affiliate value never reaches your trigger, Zapier has nothing to credit and the referral or sale will be rejected. Test this before you build the rest of the Zap: run the flow yourself through a real affiliate link and check the value appears in Zapier’s test data.
Your trigger app’s support team is the right place to ask how to carry a value from the page into the trigger — they’ll have a guide for it.

Record a referral or a free trial

Use this when someone signs up, starts a trial, or books a demo, and no money has been taken yet.
1

Add the action

Add an action step, choose Referly, and pick Create Referral.
2

Fill in who the customer is

Map Referral Name and Referral Email from your trigger. Both are required.
3

Add your own reference

External User ID (from your system) is required. Use whatever your other tool calls its customer or user ID, so you can match the two systems up later.
4

Say which affiliate to credit

Put the click ID or affiliate link name into Affiliate ID. If your trigger carries the affiliate’s own email address instead, use Affiliate Email.To type a fixed value rather than picking one from the trigger, select the three dots at the right of the field and choose Custom.
5

Add the plan, if it helps

Plan is a free-text label like Pro trial. It shows on the customer’s record. Leave it blank and Referly stores N/A.
6

Test

Select Test step, then check the customer appears under referred customers with the right affiliate against them.

Record a sale

Use this when money is actually taken. Referly works out the commission itself.
1

Add the action

Add an action step, choose Referly, and pick Create Sale.
2

Fill in the customer and amount

Map Customer Name, Customer Email, and Total Amount. All three are required, and the amount has to be above zero.
3

Say which affiliate or customer to credit

The Referral ID field is more flexible than its name suggests. It accepts the ID of an existing referred customer, a click ID, an affiliate link name, or an affiliate ID.If this is the first time you’re recording anything for this customer, put the click ID or affiliate link name here — Referly will create the referred customer, attach them to the affiliate, and then record the sale.If the customer was already recorded as a referral, you can leave it blank. Referly matches on Customer Email and credits the affiliate they’re already attached to.
4

Add your invoice reference

External Invoice ID (from your system) is optional but strongly worth filling in. It’s how you’ll match a Referly sale back to the order in your billing tool when something looks wrong.
5

Override the rate, only if you need to

Commission Rate Override replaces the affiliate’s usual rate for this one sale. Leave it blank and Referly uses the affiliate’s own rate, or the rate from their commission plan.
6

Test

Select Test step, then check the sale and its commission appear on the affiliate’s record.
Recurring payments need one Zap run per payment. Point the Zap at your billing tool’s “payment succeeded” or “invoice paid” trigger rather than its “subscription created” trigger, and Referly will keep paying commission for as long as the affiliate’s commission plan allows.

Example: post to Slack when a sale comes in

A good first Zap, because nothing can go wrong in Referly.
  1. Trigger — Referly, New Sale Created.
  2. Action — Slack, Send Channel Message.
  3. In the message, mix your own words with values from the trigger: the affiliate’s first name, the customer’s name, the sale total, and the commission earned.
  4. Test, then publish.

Example: add new affiliates to your email list

  1. Trigger — Referly, New Affiliate Created.
  2. Action — your email tool, its “add or update subscriber” event.
  3. Map the affiliate’s email, first name, and last name. Most tools let you also store the affiliate link, which is handy for personalised onboarding emails.
  4. Test, then publish.
If you use Klaviyo, Mailchimp, MailerLite, or Brevo, Referly can do this without Zapier at all. See email integrations — a direct connection is more reliable and doesn’t spend Zapier tasks.

Example: record a sale from a checkout Referly doesn’t support natively

  1. Make sure the tracking script is on your site and the affiliate value reaches your checkout, as described above.
  2. Trigger — your checkout tool, its “new payment” or “order paid” event.
  3. Action — Referly, Create Sale. Map the customer’s name, email, and the amount, and put the affiliate value into Referral ID.
  4. Test with a real, small purchase, then publish.
Check whether Referly already supports your platform directly before building this. Stripe, Shopify, WooCommerce, Paddle, Chargebee, and others have direct connections that handle attribution, refunds, and recurring payments better than a Zap can.

Field reference

Required fields are marked. Everything else is optional.

Create Affiliate

An affiliate created this way gets the welcome email if they end up active, and gets any automatic promo codes your program creates.

Update Affiliate

Create Referral

You must fill in either Affiliate ID or Affiliate Email.

Update Referral

Create Sale

Update Sale

Find Affiliate, Find Referral, Find Sale

Delete Affiliate, Delete Referral, Delete Sale

Each takes the record’s ID and a Confirm Deletion field, so a mis-mapped Zap can’t quietly wipe records. Deletions can’t be undone.

What Referly sends when a Zap triggers

Affiliate triggers hand over the affiliate’s name, email, status, commission rate, affiliate links, promo codes, totals for referrals, clicks, revenue and commission earned, and their commission plan and tier. Referral triggers hand over the customer’s name and email, your external user ID, their status and plan, total revenue and total commission generated, the landing page they arrived on, and a nested block with the affiliate’s details. Sale triggers hand over the amount, commission rate, commission earned, your external invoice and sale references, the products bought, whether a payout has been created, and nested blocks with the affiliate and the referred customer. Delete triggers only hand over the record’s ID — the record is already gone, so there’s nothing else to send.

Testing your Zap

Test the whole path, not just the steps.
  • Test with a real affiliate link. Open your site through yourwebsite.com/?ref= plus a real affiliate’s link name, in a private browsing window, then go through the sign-up or checkout as a customer would. This is the only way to know the affiliate value is being carried through.
  • Check both sides. After the Zap runs, look at the affiliate in Referly and confirm the referral or sale is on their record with the right commission.
  • Use Zap history. Zapier’s Zap history shows every run, the data that came in, and the exact error if a step failed. It’s the first place to look when something doesn’t arrive.
  • Delete your test records. Test referrals and sales count towards your plan’s limits and skew your reporting. Remove them once you’re happy.

Limits to plan around

How often a Zap can write to Referly. To keep things fast for everyone, Referly limits how many requests a connection can make: 100 a minute for reading, 30 a minute for creating, updating, or deleting, and 20 every fifteen minutes for anything to do with sales. Going over doesn’t break the connection — the request is refused and Zapier retries — but it does mean Zapier is the wrong tool for importing thousands of historical records. Use the import tools for that instead. Your Referly plan’s limits. Affiliates and referred customers created by a Zap count towards the same limits as ones created any other way. Once you’re at the limit, the step fails with a message saying so. Zapier’s task allowance. Every action step that runs successfully spends a task. A busy program can get through a free plan’s monthly allowance in a couple of days. One program per connection. A connection can’t reach across programs. No two-way syncing. Two Zaps pointed at each other will loop. If you create affiliates in Referly from another tool and also push Referly affiliates back to it, add a filter step so each Zap ignores records that came from the other one.

Troubleshooting

Your plan doesn’t include API access, or your trial hasn’t converted to a paid plan yet. Check API access, then try connecting again.
The value in Affiliate ID doesn’t match any affiliate, click, or affiliate link in the connected program. Open the failed run in Zap history and look at what was actually sent — most often the hidden field on your form arrived empty because the visitor didn’t come through an affiliate link, or the field wasn’t filled in on page load.
Total Amount was empty or zero. Some checkout tools send the amount in cents or as a formatted string with a currency symbol — add a Zapier formatting step to turn it into a plain number first.
The sale wasn’t tied to an affiliate. That happens when Referral ID was blank and the customer’s email doesn’t match a referred customer already in Referly. Check the email matches exactly, or fill in Referral ID on the next run.
Someone with that email is already in this program. Use Update Affiliate instead, or put a Find Affiliate search in front of the action and only create when nothing is found.
Both a direct integration and your Zap are recording it. If Stripe or Shopify is connected to Referly directly, that connection already records the sale, and your Zap is adding a second one. Turn one of them off.
Check the Zap is published rather than left as a draft, and that the record was created in the same program the connection points at. A published Zap also ignores anything created before you published it.

Disconnect Referly from Zapier

Disconnecting is done on Zapier’s side. In Zapier, open My Apps, find the Referly connection, and remove it. Any Zap using it stops immediately, so check which Zaps depend on it first. Zapier connections don’t appear on your API keys screen, so there’s nothing to delete in Referly afterwards.

Make

The same idea, with more control over each step.

All integrations

Check for a direct connection before building a Zap.

API keys

For custom integrations built by a developer.

Install the tracking script

Required before Zapier can attribute anything.
Last modified on July 21, 2026